Платежные сервисы ЮMoney для HostCMS
Как настроить прием платежей через ЮKassa
Чтобы настроить прием платежей по этой инструкции, нужно подключиться к ЮKassa и получить параметры
shopId и Секретный ключ.shopIdпоявится в личном кабинете ЮKassa сам, когда вы подключитесь к сервису,секретный ключнужно самостоятельно выпустить и активировать в личном кабинете ЮKassa.
Когда у вас будут оба этих параметра, можно переходить к настройке приёма платежей по этой инструкции.
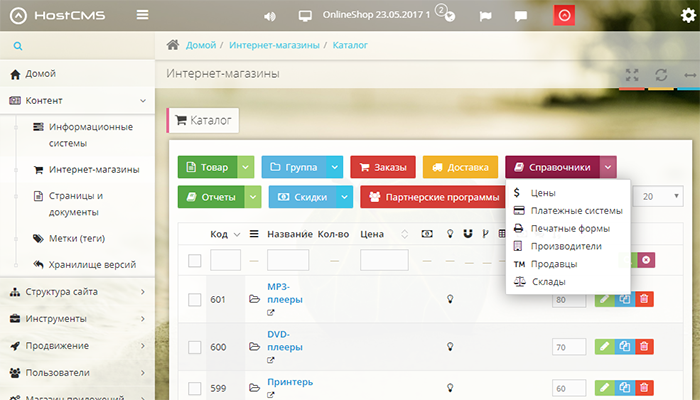
- В панели управления сайтом откройте раздел Интернет-магазины, выберите ваш магазин и нажмите Справочники — Платёжные системы.

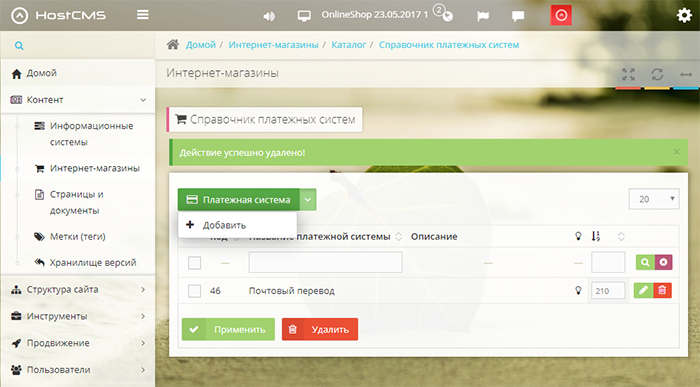
- Наведите курсор на заголовок «Платёжная система» и нажмите Добавить.

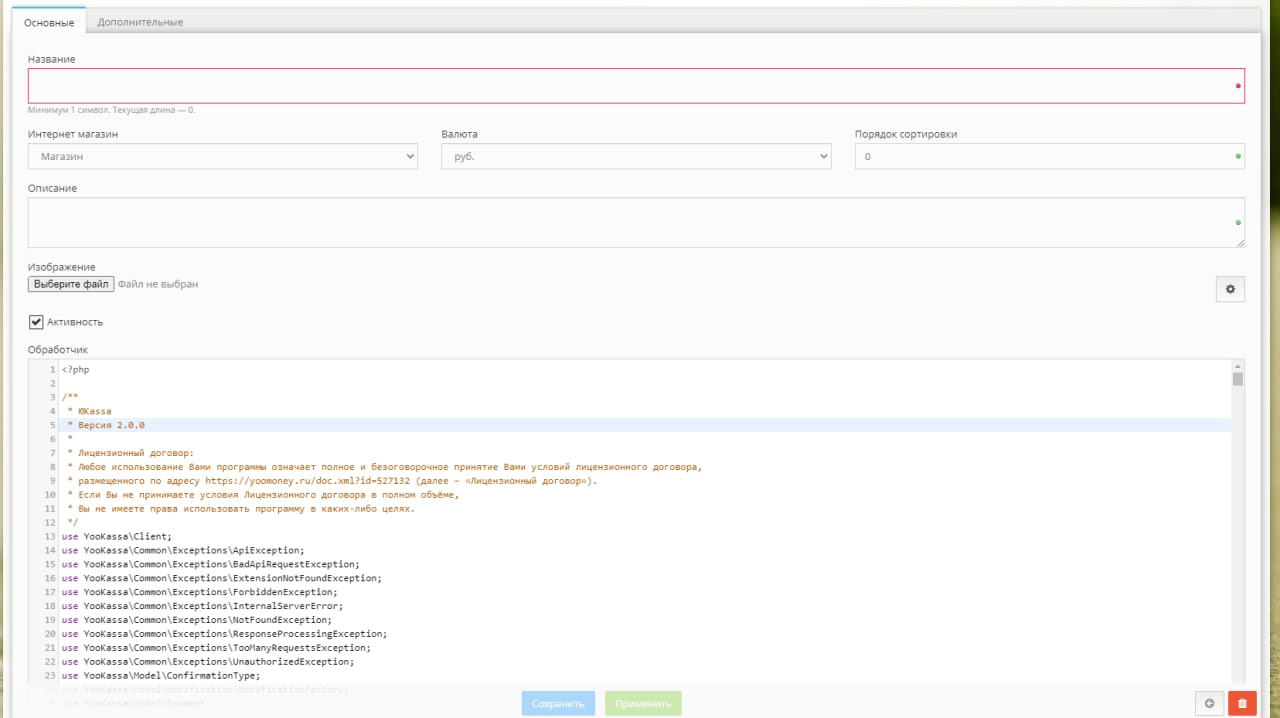
- Откроется страница настроек платежной системы.
 Заполните поля на странице с помощью этой таблички.
Название ЮKassa Валюта Руб. Описание Банковские карты, электронные кошельки, интернет-банки и другие способы оплаты. Активность Поставьте галочку ОбработчикВ это поле нужно вставить код из файла, который находится в архиве с модулем ЮKassa.- Скачайте архив с модулем. В нём есть папка yoomoney и файл handlerXX.php.
- Папку yoomoney скопируйте в корневой каталог сайта на вашем хостинге.
- Код из файла handlerXX.php скопируйте в поле Обработчик и отредактируйте в нём следующие строчки по подсказкам из таблички.
protected $ym_shopid = '000000';Вместо нулей подставьте свой shopId. Его можно скопировать в личном кабинете ЮKassa (он будет в левом верхнем углу каждой страницы).protected $ym_password = 'abcde00000abcde00000';Между кавычек вместо abcde00000abcde00000 подставьте секретный ключ. Его нужно сгенерировать и активировать в личном кабинете ЮKassa. protected $yoo_description = 'Оплата заказа №%id%';Это описание транзакции, которое пользователь увидит при оплате, а вы — в личном кабинете ЮKassa. Например, «Оплата заказа №72». Чтобы в описание подставлялся номер заказа (как в примере), поставьте на его месте %id% (Оплата заказа №%id%). Ограничение для описания — 128 символов. protected $sendCheck = true;Если вы подключали решение ЮKassa по 54-ФЗ, оставьте в строчке true.Если вы не подключали решение ЮKassa, поставьте в строчке false.protected $sendSecondCheck = true;Отправлять в ЮKassa данные для чеков (54-ФЗ) protected $orderStatusSecondCheck = 3;Статус заказа, при переходе в который будут отправляться закрывающие чеки. Берется из списка статусов заказов (Домой -> Интернет-магазины -> Справочники -> Справочник статусов заказа). По умолчанию - "Доставлено" protected $autoRedirectToKassa = false;Направлять пользователя на страницу оплаты сразу после выбора метода оплаты. По умолчанию - false protected $enable_logging = false;Включить логирование. По умолчанию - false protected $kassaTaxRateDefault = 0;Оставьте эту строчку без изменений, если вы поставили false в предыдущей строчке (protected $sendCheck = false).Отредактируйте эту строчку, если в предыдущей вы поставили true (protected $sendCheck = true): вместо нуля поставьте значение из списка, которое соответствует ставке НДС в вашем магазине. Например, если ваша ставка — 10%, вместо нуля нужно поставить 3.- Без НДС
- 0%
- 5%
- 7%
- 10%
- 20%
- Расчётная ставка 5/105
- Расчётная ставка 7/107
- Расчётная ставка 10/110
- Расчётная ставка 20/120
Это будет ставка по умолчанию: она будет в чеке для товаров, у которых вы не указывали другой ставки.
protected $kassaTaxRates = array (2 => 0, 5 => 0, 19 => 0, 20 => 0, 21 => 0, );Если вы поставили false в строчкеprotected $sendCheck = false, оставьте эти строчки без изменений.Если вы поставили true в строчкеprotected $sendCheck = true, нужно соотнести идентификаторы ставок НДС на вашем сайте (столбик слева) с идентификаторами ставок НДС в ЮKassa (столбик справа). Идентификаторы ставок в ЮKassa:- Без НДС
- 0%
- 5%
- 7%
- 10%
- 20%
- Расчётная ставка 5/105
- Расчётная ставка 7/107
- Расчётная ставка 10/110
- Расчётная ставка 20/120
protected $sendChangeStatusEmail = true;Если вы хотите получать два письма об оплате (при изменении статуса заказа и при подтверждении оплаты от ЮKassa), оставьте в строке true.Если вы хотите получать только одно письмо (после подтверждения оплаты), поставьте в строчке false.protected $kassaTaxSystem = 0;Оставьте эту строчку без изменений, если вы поставили false в предыдущей строчке (protected $sendCheck = false).Отредактируйте эту строчку, если в предыдущей вы поставили true (protected $sendCheck = true): вместо нуля поставьте значение из списка, которое соответствует вашей системе налогообложения. Например, если ваша СНО — Упрощенная (УСН, доходы), вместо нуля нужно поставить 2.- Общая система налогообложения
- Упрощенная (УСН, доходы)
- Упрощенная (УСН, доходы минус расходы)
- Единый налог на вмененный доход (ЕНВД)
- Единый сельскохозяйственный налог (ЕСН)
- Патентная система налогообложения
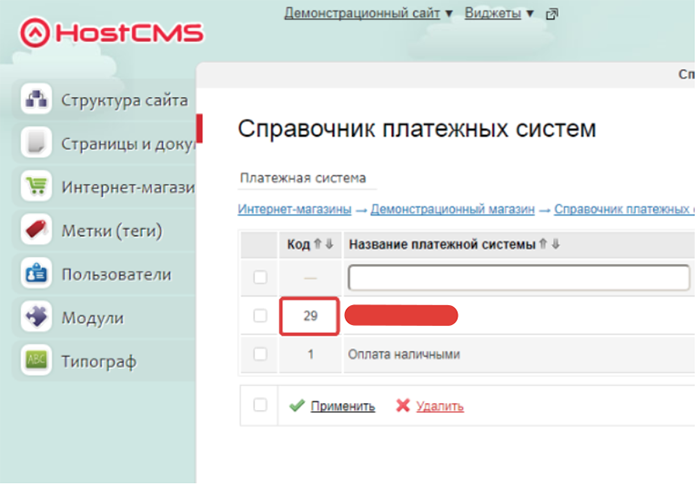
- Сохраните настройки и перейдите в раздел Интернет-магазины — Справочники — Платежные системы. Скопируйте число, которое будет написано рядом со словами «ЮKassa».

- Вернитесь в настройки платежной системы (два раза кликните по названию «ЮKassa») и вставьте скопированное число вместо XX в поле «Обработчик». Конкретно — в эту строчку:
class Shop_Payment_System_HandlerXX extends Shop_Payment_System_HandlerДля примера представим, что вы скопировали и вставили в Обработчик число 12. Тогда строчка будет выглядеть так:class Shop_Payment_System_Handler12 extends Shop_Payment_System_HandlerВнимание. 12 — это пример, у вас будет другое число. - Сохраните настройки еще раз. Готово, можно проверять прием платежей.